Saturday, August 25, 2012

Playing with Texture #1

I love texture in all types of forms - visual or tactile; on fabric and other surfaces. 

Have you ever played with modeling paste or joint compound? Joint compound you can buy at home improvement stores thus paying a lower price than you would for molding paste (Golden) or modeling paste (Liquitex).

 I have played with/experimented with both of these mediums with great success on canvas.

This textured painting is one of my first ones playing with molding paste. I had it on hand one day at the studio and started out just trying out different textures with various materials around the studio. Here are some before and after pics of the piece before it was painted: (click on photos to see larger image)


     I used the end of a paintbrush to create the swirl that became the sun. Then painted with acrylics I had on hand and rubbed gold paint onto the piece once it was dry.


I dragged a hair pick through the paste to create what became the river. I did not plan the outcome, just kept trying various tools.


One of my favorite texture tools is punchinella, the stuff left over when sequins are created. It usually comes on a roll like a ribbon and can be used like a stencil to apply the paste through. The blue section I simply used a palette knife similar to the way you would create texture with frosting, with an up-and-down motion.

The little squares you see next to the tree branches was done by using a very open-weave fabric. Place the fabric on the canvas and push the paste through the squares, then pull away. It creates a very raised surface.  
I have more texture paintings/techniques to share. Let me know in the comments if you ever use this type of technique. I would love to see what you have done and will link back to your blog or website if you provide the link.

Tuesday, August 21, 2012

Playing with Clay

Working at an art studio gives me the chance to play around with a variety of mediums. One of my favorites is clay. I like the clay that is grey when unfired and turns white when fired.

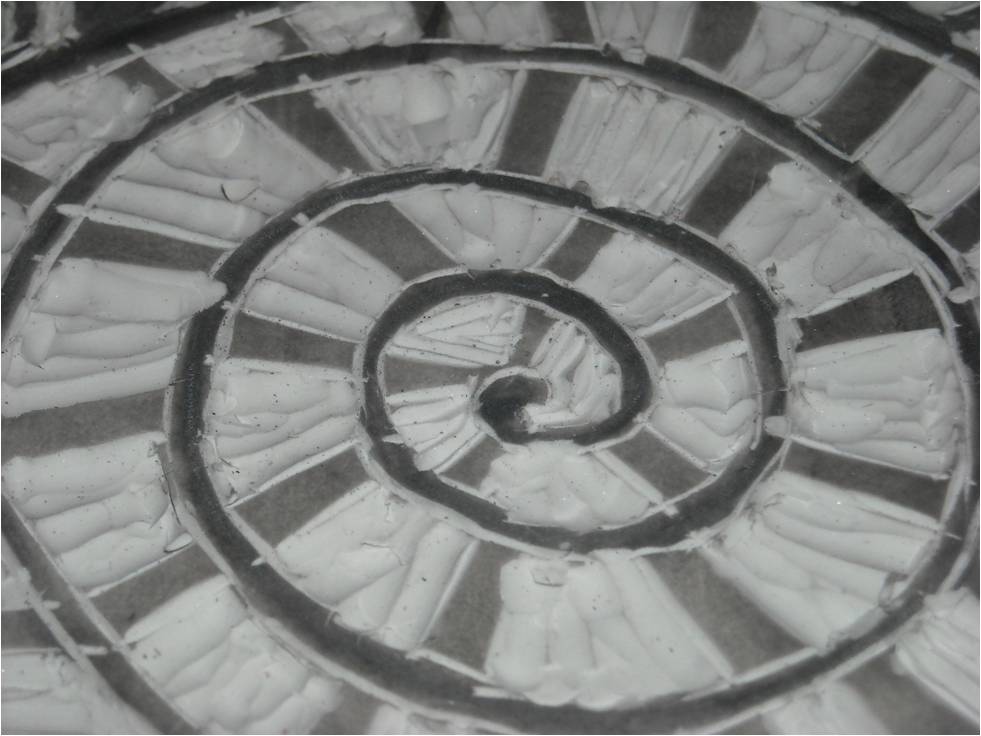
One of my most recent works-in-progress is a kind of free-form bowl that I built from a slab of clay and textured with various items that were available to me that day.

I'm calling this my rose bowl, hee hee. I have been practicing making clay roses and get better each time I try. 

I love experimenting as often as I can. It keeps the creative juices and ideas flowing. Even though I am a novice, I know that experimenting and playing around with mediums will always lead to improvements and new ideas.

What mediums do you allow yourself to experiment with?

Tuesday, May 15, 2012

Diabetes Blog Week - One Great Thing


The Diabetes Blog Week entry for Tuesday, May 15th is/was One Great Thing. I debated skipping this entry because managing diabetes is often intense and most of the time I do not feel as if I have done anything right. I can tell you everything I have done wrong or could have done much better on any given day at any given time.Why does it seem harder to identify the good stuff that we do?

One great thing that I do and have done for years is check my fasting blood glucose every morning when I get up. It is one of the first things that I do every day. I have had my moments over the last 13 years but for many years now I get out of bed and head straight for the table where I keep my blood glucose meter and supplies. Knowing my blood sugar level first thing in the morning helps me know how I should start out my insulin doses for the day and what I should or should not eat.

Another great thing that I do is go to the doctor on a regular basis so I can have all of those wonderful regular tests that a person with diabetes needs to have. The most regular one is the hbA1c which gives a rating to blood sugar over a three month time period.

And another great thing, since I am on a roll here - hehe - is that I absorb a lot of information about diabetes, managing it, foods to eat, foods not to eat, side effects of Humalog and Levemir, about the way stress elevates blood sugar levels, the lows that can happen after exercise, about the ways that a hypoglycemic episode (low blood sugar episode) can be a surprise that one needs to be prepared for . . .and so on.

That's it for me. You can check out other posts about One Great Thing at the Diabetes Blog Week site.

Your comments are always welcome, I love hearing from you!


Monday, May 14, 2012

Diabetes Blog Week 2012 - Find a Friend


Diabetes Blog Week began this Monday, May 14th. To participate I only have to do a diabetes blog post every day for a week. I think I can do that but we'll see. I have had diabetes going on 14 years and in the last year I have begun to discover all of the diabetes bloggers that exist on the internet. The intent is to create connections amongst the DOC (diabetes online community). You don't have to have diabetes to benefit from this community. Many of us know others who live with the stress of managing diabetes.  

This is the third year for Diabetes Blog Week and my first time as a participant. Started by Karen Graffeo of the blog Bitter-Sweet Diabetes, the first topic is Find a Friend. I have discovered that it really helps me to be able to talk to and read about what other people with diabetes go through and how they deal with managing this chronic illness.

One of the first blogs I stumbled upon was The Butter Compartment by Lee Ann Thill who is also an art therapist. I was intrigued by her blog title and discovered that this is where she keeps her insulin. I keep my 85% dark chocolate in my butter compartment and keep my insulin pens on the shelf just underneath. Lee Ann also puts on Diabetes Art Day which will take place on September 24th this year. I have already begun thinking of the artwork that I want to post for that day. She also organizes the World Diabetes Day Postcard Exchange which takes place in November of each year.

I stumbled on the Texting My Pancreas blog last year and I love her pragmatic, real-life way of blogging. I have discovered from reading the blogs of people with Type 1 Diabetes that they have some of the same issues that Type 2's have in terms of unexpected highs and lows.

If you know of any Diabetes blogs I should check out, let me know in the comments.

Tomorrow's post, Tuesday, May 15th - One Great Thing

Sunday, April 1, 2012

Clay Class


Clay. There is something so soothing about holding clay in your hands. It is cool, calming and fun to manipulate.

These wonderful forms were shaped by a class of beginners at the studio.


I so love working in a creative environment every day.

Tuesday, March 27, 2012

Blind Painting

Art Detour was held recently in downtown Phoenix. Art Detour is an annual, self-guided tour of artist spaces, art spaces and other art venues and is organized by Artlink Phoenix .


At Warehouse 1005, one of the many Art Awakenings art studios around Arizona, I painted this while blindfolded. I had a palette of paint colors, an 8" x 8" canvas secured on an easel, and a few brushes. Since I am left handed, I used my right hand as a way to register the location of the canvas so I would not be 'painting the air'. As I picked up the first brush and tried to remember the colors on the plate, 'tree' came to mind so that is what I went for. Then some grass and some birds.

There was a band playing music just outside the studio doors. So I listened to the music and let myself paint. It is an awesome experience to paint while blindfolded. No judgments, no inner critic chatter, no worrying about others, no corrections to make - just painting. I highly recommend the experience.

People came through all day and created their own blind paintings. All of the paintings will be included in a community exhibition on May 4th through May 18th at Warehouse 1005 in downtown Phoenix.

Monday, March 26, 2012

It's All in How You See It - A Spontaneous Painting

I did this painting with modeling paste, a palette knife, a sponge, a piece of grid fabric and a piece of sequin waste. I wanted to create something just for peaceful meditation that comes from just letting a piece emerge. My only goal was to let it have some texture, which it does.

I first mixed purple with the modeling paste and applied it with the palette knife. Then I mixed up some red with the modeling paste and applied that. Then it came to me to try applying the green with a sponge, just across the peaks left by the modeling paste. I painted onto the grid and then pressed the painted side of the grid down into the paste. I used a sponge to paint through the holes in the sequin waste. It was a creative adventure. Fun.

Painting, well creating things, is very meditative for me. The actions, the process are a joyful zone for many of us. Especially when I am free of worrying what others might think. When I am free from the nattering of my inner 'what were you thinking?' critic. When I am perfectly alright with painting over it and doing something else once I am finished.

What is it like for you? When you are on the inside of creating something?

When I was taking pictures of it, I realized that depending on which way I turned the piece, I saw different things.

This one makes me think 'The Red Sea'.
Red Sea

This way I see 'Stormy Weather' with lightening and turbulent winds.
Stormy Weather


These two make me think of trees.
 
 So kind of like life, it seems to be about how you choose to see things. 

Monday, February 6, 2012

Marbling with Shaving Cream

Explore. Play. Create. Be adventurous. Discover. Have fun.

Marbling with shaving cream is delightful! My artistic and creative friend Quinn McDonald had never tried this so we did some yesterday on paper. I love sharing techniques with others. Especially when they are as adventurous and willing to explore as Quinn.

Here are photos of some of the steps we took:


Shaving cream on plastic. Hair pick to the left
Dropping inks onto shaving cream.
Inks moved with hair pick.
Hair pick used to move inks. 

Pull #1
I forgot to take photos of laying the paper on top of the shaving cream once your colors are moved the way you like them. Just make sure your paper makes full contact with the colors on the cream before lifting it and scraping off the excess shaving cream. 
Pull #2

Pull #3


Pull #1

Another first pull.
Pull #2 or #3
Marbling with shaving cream is a fun and easy activity that can be done by adults, children, seniors, or for class room activities.


You can do it almost anywhere.

All you need is
  • a flat surface
  • a cover to protect your flat surface (i.e. foil, foil pan, a cut open garbage bag, wax paper)
  • shaving cream (not gel)
  • ink or paints - Permanent inks like Dr. Ph. Matin's, acrylic inks, Adirondack inks by Ranger, acrylic paints, fabric paints almost anything will work, just try it.
  • a tool for moving paint across the surface (i.e. hair pick, wide tooth comb, wooden skewers)
  • Paper - you can experiment with copy/printer paper, watercolor paper, drawing paper, etc.
  • a scraper or squeegee for scraping the extra shaving cream off of your papers to reveal the design. 

Friday, January 13, 2012

Playing with Friends - Monsoon Papers

Playing with friends - what does that bring to mind for you? For me, it was a lovely January afternoon in Phoenix creating monsoon papers with artists Quinn McDonald and Traci Paxton. We played in an unattached way - which I define as 'seeing what happens when . . .' and being completely unattached to the outcome. The joy is in the playing and the discovery that the playing leads to. Our explorations with inks, a water hose and Arches Text Wove paper yielded these wonderful pieces of paper. Fun, fun, fun.

Monsoon Paper © Rosaland Hannibal
Monsoon Paper ©Rosaland Hannibal

Monsoon Paper © Rosaland Hannibal
Monsoon Paper ©Rosaland Hannibal
Artist's Hands ©Rosaland Hannibal


I have found that if you allow yourself to be unattached to the outcome, you can have a great time exploring and discovering; just play.

Monday, January 2, 2012

Creative Every Day - A Quick Painting


I have thought about joining Creative Every Day for almost two years. It is a challenge set up by Leah Piken Kolidas to encourage others to create. You don't have to create every single day - you do what works for you, so there is no need to spend time whipping yourself if you happen to go a day without sharing some creative aspect of your life.
 
Leah defines creative in the broadest sense of the word and you can read about the challenge on her Creative Every Day challenge page. 

While I was working at the studio today, I decided I wanted to do some painting. I don't often paint on canvas but I took a recycled canvas that happened to have torn pieces of paper collaged onto it. I decided to let it emerge as I painted and this is my result of my efforts. I love the texture and colors of the collaged paper. It was fun to create a piece that I like from a piece that another artist tossed away for reasons of their own.

Exercises like this are a great way for me to get out of my head and just go with it. I have been taking pictures of trees lately on my almost daily walks in the park and I am quite happy with the way this tree turned out. I did the writing with a white gel pen. The photo at the top is more true to the colors but the bottom one is a bit clearer.


Sunday, January 1, 2012

Carved Stamps


 I spent a very calm new year's eve working (at an art studio) and carving the first side of my 6 inch by 4 inch piece of soft-cut block that I believe is made by Speedball (no affiliation). This first photo is the full stamp  and the second is a closeup that shows you all of my imperfect cuts.


I think that 2012 will be a year that I leave room that allows room for imperfections, since my focus will mostly be experimenting and exploring as I create. As processes emerge from my experiments, I will learn a lot. You can see from the stamp being covered with paint and how the stamp looks on fabric, there could be some improvements if I choose to make an absolutely perfect carved stamp. But I kind of like the less formal addition of personality that the imperfect cuts add to the piece. I also love the idea of 'allowing' the imperfections to be part of the work. Just like imperfections are part of us and part of life.

It was pretty easy not to fret over the lines that are not straight. I learned a bit about which tool might give me the look that I want and which tool scoops the way I need.

One of the best parts of using this soft-cut block is that it is thick enough to cut another design on the flip side.So once finished, I flipped it over and started a new stamp. I like it too.


Flowing lines and bubbles inspired by the Raw Art Journaling technique of Free-Floating Bubbles (p.77). Disclosure, yes, author Quinn McDonald is a good friend of mine and I love this book of hers. The openness of my lines and bubbles design allows for the addition of words after stamping. I will probably use markers or gel pens to add words to the fabric.


                       ~ o ~ o ~ o ~ o ~ o ~ o ~ o ~ o ~

And I can't sign off without wishing you and yours a very Happy New Year! May the year 2012 be one in which you realize your dreams and take some of those risks you have previously been hesitant to take.

R


Friday, September 30, 2011

Promise and Gratitude

Promise


All that life holds


In the bud of a rose.


  Imagine!
Gratitude.
Sometimes I forget to take a few moments to be thankful. Thankful for the beauty that surrounds us. Thankful for the ability I have to know when to jump in and when to step away; this serves me well.
Thankful for my friends and family because they bring joy and a special kind of light to my life.
Thankful that even in the face of uncertainty, it is possible for me to stay out of the panic-zone and remain in the creative zone where thinking happens and possibilities can be explored.

Since being laid off, I am thankful even for that, because it has given me the freedom to think about and choose where I want to spend my time. Freedom to look at making money doing the things that make me happy and make a difference, in some small way, to others. I am grateful to be such a blessed individual.

What are you grateful for? Please leave them in the comments. It is hard to be sad, mad and down when you let yourself consider the things you are thankful for. Try it.

Monday, August 22, 2011

Review of Lyric Kindard's Surface Design Video

(this link will take you to the Interweave Store video download page for the video)

If you like to try different techniques for fabric. If you love learning visually. If you love having someone explain things in clear and easy to understand ways. Then you’ll probably like this video. It is available from Interweave both as a download and as a DVD.

When you visit the Interweave page about this video there is a supply list broken down for you into categories. To me, supply lists are intriguing because even though you think you know what the instructor will do with particular items, often there is the surprise of how they have chosen to use those supplies.
The video is divided into four segments and each of those segments was packed with information that was useful to me. Some of the information was a great reminder of things I had seen or heard before and some was totally new.

First Segment – Eraser Stamps. I have thought about making stamps from erasers many times and just haven’t gotten around to it. Lyric’s very clear instructions on how she cuts the stamps and her tips on cutting were great. I love the examples and demonstrations of how she uses the stamps and groups of stamps in creating her artwork.

Second Segment – Screen Printing & Stenciling. This is a great refresher or introduction on using screen printing techniques on fabric. Lyric talks about traditional screen printing and touches on thermofax screens as well. Lyric also covers a variety of stencil materials that you can do yourself with materials you probably already have at home. She also touches briefly on mixing colors in this segment and shares with the viewer the types of paints she uses to add color to her work.

Third Segment – Foiling and Photo Copy Transfers. I love foiling and Lyric covers this well and demos how to use a variety of adhesives, including her favorite for this technique. I found it hard to understand the name of the supplier for her favorite adhesive but you can find it on her website, in the links section, under Surface Design Supplies.

I must go and get some Citra-Solv. I have never used this product but Lyric’s demonstration of a photo copy transfer technique using this made me want to run out to the store and get some. It looks really easy and I can’t wait to try it.

Fourth Segment – Lyric show you have to make a little quilted journal slip cover. Her technique for finishing makes it really easy.

Overall, I thought this was a great video. I learned some techniques I did not know and was re-inspired about techniques I did. Lyric has a voice and way of talking that is easy to listen to and her explanations are uncomplicated. Whether you are a beginner just starting out in your explorations with techniques for surface design or you are experienced and looking for a bit of inspiration, this ‘sampler platter’ can be a great addition to your library.

I would love to hear your comments if you've watched this video or have thought about getting it.

Thank you for visiting my blog.

LinkWithin

Related Posts Plugin for WordPress, Blogger...